Friday, January 27, 2012

krazy k

Here are some activities we did to practice the letter "K" (and some other skills!)...

K is for Kick
One of the teachers in our program did this activity with her kids last year, of course I borrowed it!  I passed out a balloon with a "K" written on it to each child.  They kicked them around for a little bit, then I pulled everyone into a line and we watched who could kick their balloon the farthest! And, of course, we kept saying "K is for kick!"

Kite Sort
For this activity I put several "kites" on the table.  The kites are laminated pieces of colored paper.   I added a bunch of different objects on a tray (objects varied in size, texture, color, etc.).  I also hole punched the kites and added ribbon for the kiddos to pull through and practice tying. 


This activity is a little random, but I had many kiddos visiting this center to sort, count, find the letter K, and explore all the different objects.  To focus this activity in a little more on the letter sound, I'd like to find some objects that start with "K" and maybe add "K" cut-outs of different colors that match the kites.

Krazy Kite Kollage "K"
 
For our large letter art activity I used things I had on hand for the students to create kite collages.  We glued diamond shapes on the "K" (for the kites) and then decorated with pieces of tissue paper and ribbon.  

Tuesday, January 24, 2012

it snowed!

...well, last week it snowed... not quite enough for a school closure snow day so we sloshed our way to school, I changed up my lesson plans to "seize the day",  and we had a little fun with the white stuff.

I would have loved to take the kids outside, but this snow was so wet (I believe slush is the better term, but I'm taking whatever "snow" we can get!) that we would have had a bunch of waterlogged kids on our hands.  So, instead of going out, we brought the snow into us and painted it!

  • We filled two large containers about 1/3 full of snow
  • I got out paint cups and eye droppers
  • For the "paint" I used a little bit of washable tempera paint and a lot of water, basically enough paint to get some color.
  • We squeezed the paint onto the snow for a good 1/2 hour, making some beautiful rainbow snow!


I loved how the dense snow held the colors - I've done this activity with ice before and it ends up being one big brown watery mess.  

Glad we "seized the day" and used the snow while we had it!

Miss Eileen

Sunday, January 22, 2012

January language activities

I have so many stages of language development in my classroom that I'm trying to offer a broad spectrum of activities to grow skills.  I'm always on the hunt for fun review games that focus on letters or concepts that we've been discussing.    
Here are a few language activities we've done this month:

Review: Find the Inchworms (plus "Jellybeans" AND the Alphabet!)
I brought out our magnets and inchworms again and this time added our "jellybeans" (see this post) and magnetic alphabet pieces.  We had fun catching the objects with the magnetic wands and rummaging through the grass to find jellybeans: ) 
When it was time to clean up this center at the end of the week, I led my students in a group activity to sort the items.  We went around the circle catching inchworms, jelly beans, and alphabet letters and sorted them into the correct bowl.  After the items were sorted it was a cinch to put everything away in it's proper place.  (I love being sneaky with clean up!)

Alphabet Mittens:  
I believe the mitten pattern that I used is from a Mailbox book that I have.  (I made them a number of years ago).  To prepare, I hung the mittens in alphabet order from a string and clothespins.  For a group game I took off random mittens and passed them out to the students.  We sang through the alphabet and figured out which letters were missing.  The game was lots of fun when Miss Eileen got a little silly if a letter is not there ; )  I think we played this game at least four or five times -over the course of two weeks - and sang through the alphabet at least 20 times!

Shaving Cream Writing:  
For my younger students I tried using shaving cream to practice our letters.  Since this was an introduction to playing in shaving cream, it ended up being more about the experience than the writing.  Now that we've experienced it, I'm hoping next time I try this we can be a little more intentional about writing current letter we're focusing on or our names, etc.

Wednesday, January 18, 2012

movin' along...

Here are some transportation activities we did last week:

{Language} Alphabet Roads: 
These printables are from makinglearningfun.com - we cut the letters out, glued them to construction paper, and laminated them.   I used to have a set of mini cars that would work better with these, but our matchbox cars are working for now. 


{Sensory}  Beans, Blocks and Cars: 
Rocks or sand would work with this activity too, and I when I do it again I'll put it in a larger, flat container - the sensory table is too curved and deep to run the cars around much.  
My students ARE having a great time with the trays connected to the side of the table.  They fill the tray with beans and run the cars along the length of the tray through the beans. (AND we're practicing using hand brooms to clean up our mess off the floor!)

{Math} Car Count (printable from prekinders.com, titled "Road Count"):
I wanted to do this activity outside in our parking lot, but it was FREEZING the day we did it, so I improvised with our classroom car collection.  I gave everyone a worksheet and blue and red crayon.  I lined up the cars on the table, one by one; if it was blue we colored a circle blue, if it was red, we colored the circle red.  At the end we counted up our circles to see which color had the most.  
This activity challenged my 4's a little and it was a great way to assess where my students were with their attention spans, listening to and following directions, and counting skills.


{Building} Train Table: 
Always fun to play with trains!  We kept our snow out and had some other helpful vehicles clearing the tracks for the trains to pass through.


{Art} Wheel Art: I have a HUGE amount of leftover shapes, pictures, etc that I am trying to use whenever I can.  I was happy to put them to work with this activity.  I placed the shapes and pictures on a table with glue, scissors, and markers, and let the kiddos make their own transportation artwork.


{Art, Sensory} Car Paint & Car Wash:  Painting with cars is so much fun!  We did a group painting, I covered our tables with paper, put the paint on trays, gave everyone a car and let them go at it.  We had a lot of finger painting too and kiddos with paint up to their elbows!


To clean up, we had a car wash the next day.  We used large, flat containers with a little soap and water at the bottom, gave the students painting sponges and let run their cars and trays through the wash!

Keep following along for more transportation fun!

Miss Eileen


Tuesday, January 17, 2012

the pigeon...


I recently introduced my class to the pigeon - if you haven't read these books, I recommended them for some classroom hilarity - thank you Mo Willems!  This book was perfect to highlight our transportation unit and our focus on buses.

I made some photocopies of the pigeon (so I didn't have to cut up my book - hehe) and put pictures of the the pigeon around our room.  He ended up on the front of our bus, but the students were warned... don't let the pigeon drive the bus!

The pigeon is a fairly simple combination of shapes so I thought I'd lead a directional drawing activity.   This was a pretty good experience for 4 year-old's who are handy with a pencil, although some of my 3's gave it a go and they were pleased with their drawings too.


Here are some of our drawings:
So cute!
I was also pleased to find an animated DVD of the book at our local library!  I used it as a special activity at the end of our week.  The kiddos were riveted and joined in the story and kept asking if we could watch it again, and again, and again...


I think the pigeon might stay around our classroom for awhile, popping into activities every now and then.  Oh, I almost forgot, the pigeon even has his own website!  Check it out:
pigeonpresents.com

Happy Reading : )

Miss Eileen

Monday, January 16, 2012

the wheels on the bus

I'm going to have to post more entries per week to keep up on all the learning going on in our classroom!  Our class is in the midst of our transportation unit: wheels, wings, & water.  

Buses are a good way to learn about wheels in the classroom; in our culture they are a school icon, they are a "community" way to get around - lots of space for everyone!, and they're featured in the coolest preschool song ever (in my estimation) "The Wheels on the Bus."

Dramatic Play: Bus!
One of my few memories of preschool is sitting on a "bus" in our classroom with our teacher and reenacting the "Wheels on the Bus" song.  If that activity made that strong of impression on me as a four year old, there must be something significant to that classroom community experience.  

I have a hand-me-down "house" (of sorts) that I use to make all kinds of dramatic play areas.  It is four, square pieces of plywood hinged together (it folds up zig-zag style) with a window cut out of each square.  Let me tell you, it makes a great bus!  


I cover the outside in yellow paper, add some wheels and lights (that I've laminated so I can whip them out for years to come), I put some chairs inside and we're in business.  We even have a steering wheel (it used to blow up but doesn't any more - no matter).
Inside our bus I added numbers to the chairs, with correlating numbered tickets and dress up from our housekeeping area. 


 The kiddos had lots of fun imagining where they were going, taking turns being the driver, matching their tickets to their seats, helping Miss Eileen sing the song... love it!

Math: Bus Count and Park

To create this game I programmed a large sheet of paper with parking spaces and dots, 1-12.  I made buses with numbers 1-12 on them (the buses were from our Accucut machine, but I just found bus cut-outs at our local dollar store too).  I laminated all the pieces.  
I put this set out as a center area for counting practice, but I also played it as a group game.  I passed out the buses to the students, we counted the dots, team-work style, and if they had the matching bus they were able to drive their bus to the matching parking space.

Art: Bus
I love to use what I have on hand, and this art project was sitting in my file drawer.  The kids were very engaged in counting the windows and wheels, gluing them in place and adding their own colored design to their bus.
Stay tuned for more transportation activities!

Miss Eileen

Tuesday, January 10, 2012

jaguar prints

"Trendy" is not me, but this project turned out looking like a piece of clothing you'd see hanging in the kids section at a department store.  That was not my intention - but unexpected outcomes are always welcome with a project!

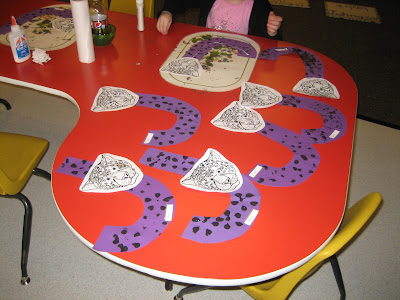
Our animal friend for letter "J" was a jaguar.  Most of my students were already familiar with this animal thanks to pop tv (apparently Diego has a jaguar friend? - I'm not up on current kids shows...).  Anyway, for our large letter "J" I decided to do jaguar prints - jaguars have a specific rosette spot pattern on their body and I thought that might be a fun art element in our project.

I started with pre-cut "J" shapes, I would have preferred orange, but I had a whole stack of purple "J's"cut out from a previous year that I wanted to use up (I'm all about using what I have on hand - actually I'm a little neurotic about it...). 

To create the circular spot print I used the bottom of small plastic pop bottles, dipped in black paint. The bottles worked really well to create spots - and lots of spots quickly.  

We also added a jaguar face to our "J" (I found a jaguar mask printable on Google images) and glued on googly eyes.  They turned out great!

 Another "J" center:
"Jellybeans" - super simple and super popular with the kiddos.  
I placed a handful of colored floral rocks on a tray with sorting bowls and called them "jellybeans".  That's all!

We:
  • Sorted...
  • Counted...
  • Planted magic beans...
  • Shared (and fought over them- typically the fighting is first- ha!)...
  • Figured out which color had the most, which had the least...
  • Put the in the bowls and shook them around...
  • Made pictures out of them...

Saturday, January 7, 2012

baby it's cold inside: winter play

Living at a low altitude in the northwest doesn't lend itself to many snow experiences.  About once a year we may have a snow "event" (and trust me - it's ant EVENT when it happens) but generally, to experience "winter" you have to travel to the mountains.  
Some of my preschoolers have not had that experience so I hope I've enlightened them with some pretend winter fun.

Here's what we did:

*housekeeping, winter dress-up:
I found gloves and hats at the $ store, bought matching colored sets, and added them to our housekeeping  (dramatic play) area.  What fun!
I observed:
  • pretend snowball fights and snow angel making (too bad the carpet doesn't leave an impression!)
  • fingers working hard to fit into the correct holes in the gloves
  • color matching; choosing the hats and gloves that were the same color
  • hats being worn by my lion-headed chairs (wish I had taken a picture!)


*building, felt snowmen:
(inspired by Frugal fun 4 boys)
I went super simple and used felt I had on hand to make the shapes.  The kiddos played on and off at this center, arranging and rearranging all the pieces.


* sensory/science, ice:
We're blessed to have an ice machine on campus : ) in the morning we filled up a bucket with ice to pour into our sensory table.  I added polar bears and penguins for imaginary play.
*gross motor, snowman toss:
I found this activity at the Little Illuminations blog.  Ayn had covered her pieces in contact paper to stick them to the mesh pop-up hamper.  She ended up stapling the face on because the contact paper didn't stick well to the fabric.  I tried a few sticky alternatives without much luck.  
 
  • First, I tried double-stick tape which worked until they were hit with the bean bag.  The students did their best to reapply the face - it was comical to look every once-in-a-while and see the face rearranged.
  • Next, I tried velcro on the back of the pieces, but they fell off too.
  • I finally put the pieces onto a piece of white paper and taped it onto the hamper.  This worked OK, but I'm still looking for ideas...
One of my students commented that the snowman looked angry... I said "I'd probably look that way too if someone was throwing beanbags at my face!" : )
Any thoughts on how to make the pieces stick better (without being permanent)?

*dollhouse/car table, snow play:
I was planning on making a cute winter village like the one here at Toddler Approved. But, time got away from me so I pulled out our doll house, put it on our car table, and added buffalo snow around the house.  It was a success and I think the snow will stay on our car table through some of our transportation unit too : ).


*play-dough, snow style:
I'm going to start working my way through the Mudworks book - a great resource for all things dough related...

I used their basic, cooked, salt play-dough recipe (it turned out great) and added silver glitter during the kneading process.  We also used these playdough math mats from Prekinders for some counting fun.

*color match, snowman clothes:
I printed and laminated these matching cards from Prek + k sharing- so cute!  Loving the free resources from everyone's blogs - it saves so much time!